How to Install a Kitchen Sink Side Sprayer
Upgrade your sink with these easy steps.
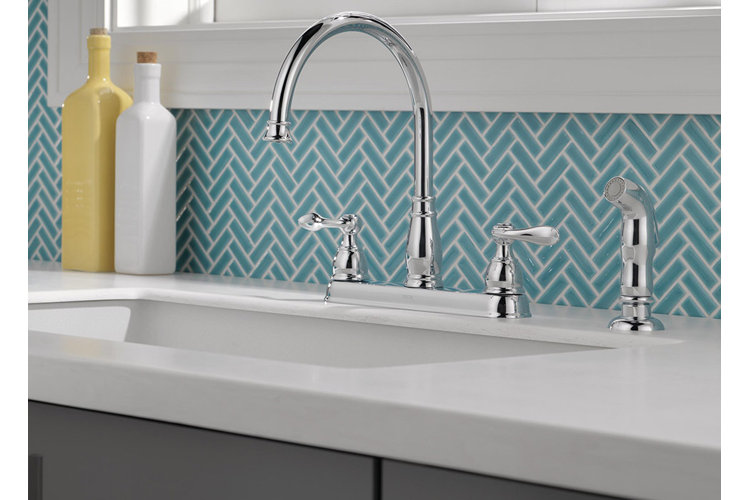
A kitchen sink sprayer, or a side sprayer, is a useful kitchen sink accessory that installs beside your kitchen faucet and can help you clean hard-to-reach spots that your everyday kitchen faucet can’t reach. Adding a sink sprayer to an existing faucet is a quick and easy way to make cleaning up easier. Read this guide to learn how to install a kitchen sink sprayer.
Before You Install a Sink Sprayer
Understand Parts of a Kitchen Sink Sprayer
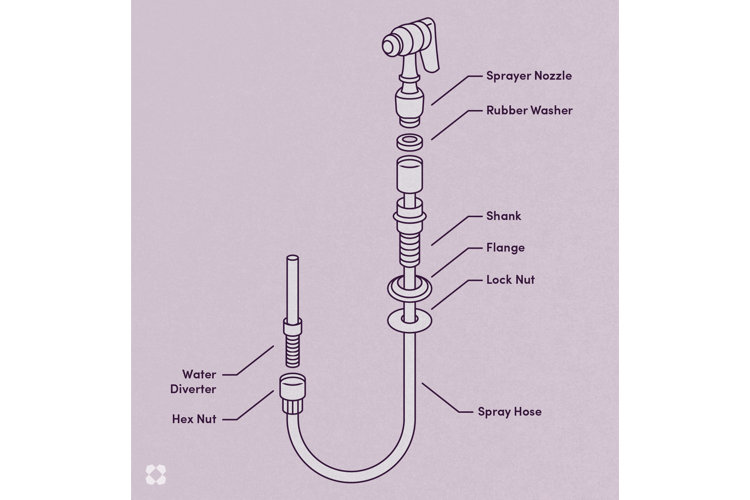
Before you start, familiarise yourself with the parts of a sink sprayer and how they fit together. Use the diagram below as a reference.
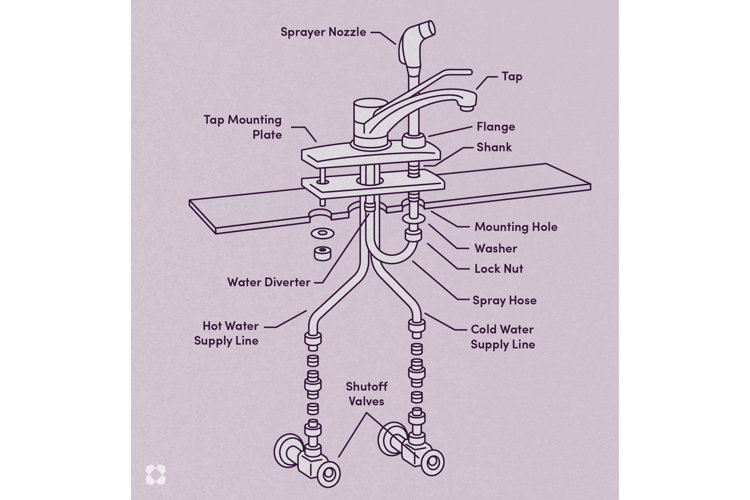
It's also a good idea to know how a kitchen sink sprayer fits into your existing kitchen sink and tap system – the diagram below should help you to visualise.
How to Install a Sink Sprayer
What You'll Need
- Pliers
- Adjustable wrench
- Plumber’s putty
- Hand drill (if an additional mounting hole is needed)
Step 1: Evaluate Your Sink’s Existing Mount and Mounting Holes.
To accommodate a side sprayer, your kitchen tap will need a water diverter and an appropriately sized mounting hole. A water diverter is usually a capped, threaded pipe that juts out under the tap assembly right between the hot and cold water supply lines. If your tap lacks this attachment, you may have to purchase a new tap with a water diverter in order to install a side sprayer. Most sinks also have a mounting hole beside the tap or in the tap plate that can fit a side sprayer – if your sink lacks one or if it is too small, use your hand drill to drill an appropriately sized hole beside the tap.
Step 2: Turn off the Water Supply.
Use either the shut-off valves beneath your sink or, if your setup lacks those, shut off the water using your house’s main water shut-off valve. To prevent water leakage during installation, turn your tap’s handles on to let out any residual water.
Step 3: Prepare the Mounting Hole.
If not already assembled, thread the flange onto the bottom of the shank and screw it on until it reaches the top of the shank. Wrap some plumber’s putty around the underside of the flange and insert the shank and flange assembly into the mounting hole from above. Beneath the sink, thread the lock nut and washer (if your assembly has one) onto the bottom of the shank and tighten it using a wrench until secure. Remove excess putty after tightening.
Step 4: Assemble the Spray Hose and Sprayer Nozzle.
If not already assembled, screw the sprayer nozzle onto the larger end of the spray hose. Try to not over tighten (this can cause pressure to build up when the sprayer is in use).
Step 5: Thread the Spray Hose Into the Mounting Hole.
Thread the smaller end of the spray hose into the shank and flange from above. Feed the hose all the way through and allow the sprayer nozzle to sit within its holder.
Step 6: Connect the Spray Hose to the Water Diverter.
Beneath the sink, use pliers to loosen and remove the cap on the water diverter, if yours has one. Keep the cap in a safe place in case you decide to uninstall your sink sprayer at a later date. Screw the hex nut end of your hose onto the water diverter. Some water diverter and supply hose setups allow you to simply press the hose onto the diverter to connect it. Tug gently on the hose to confirm it is connected properly.
Step 7: Turn the Water Supply Back on and Test.
Run your tap to ensure it is working properly. Remove the sink sprayer from its mount and test it by spraying it into your sink basin at different pressures. Ensure there are no leaks below your sink.
Enjoyed this article? Then why not also check out our tips on how to measure a kitchen sink and how to choose a kitchen sink.
