DIY Chalkboard Advent Calendar
Including a free downloadable PDF—easily trace your own festive typography at home!

© Two Little Misters
One of my favourite things about Advent is choosing my own small gifts or treats for each day. The anticipation and build up is all part of the excitement! I love trying to think of a new take on the traditional calendars, so this year I thought why not create a calendar that's also a stylish decorative feature in its own right? You don't need to be talented at hand lettering—as long as you can follow a line with a pencil you can achieve this look!
© Two Little Misters
Equipment:
A Chalkboard--I used the Burley Blackboard by Gallery
Design printed onto 2 sheets of A4 paper (download PDF here)
Blu Tack
Sharp pencil
Chalk
Jumbo Pencil Sharpener
Sticky tape
Baker's twine
Mini paper bags/envelopes
Mini wooden pegs
Small sweets/gifts
Step One:
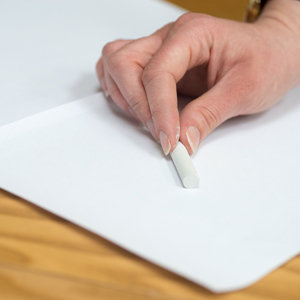
You could use any text design that you can comfortably trace. To get you started I've created one that you're free to work with. Download and print the design onto 2 sheets of A4 and tape them together at the top and bottom to create a seamless design (take care not to tape over the text). Use the side of your chalk to rub over the entire back of the paper. Cover the paper well with chalk and then tap off the excess dust.
Step Two:
Place your design onto the chalkboard, text side up and secure with Blu Tack. Using a sharp pencil, follow the outline of the design, pressing firmly. This will transfer chalk to the blackboard, giving you a guideline to work from.

© Two Little Misters
- Clean up any smudges or dusty areas with a cotton bud or small paintbrush dampened with water—simple!

© Two Little Misters
Step Three:
Carefully remove the paper and then fill in the outlines with chalk in the colours of your choice. You can sharpen your chalk with the pencil sharpener to give you more control.
- I used numbered labels on my paper bags, but you could use rubber stamps or even write them freehand with a metallic pen for extra sparkle!
Step Four:
Cut four lengths of baker's twine slightly longer than the width of your board and attach them around the back, evenly spaced (I used sticky tape). Number your paper bags 1-24 and fill them with treats. Use your pegs to attach them to the rows of twine.
© Two Little Misters
Step Five:
Once you've finished, you may like to add some accessories to suit your chosen Christmas theme! I opted to add a beautiful pine garland for a cosy, traditional look this festive season. If you don't want to put sweet treats inside your bags, ask your family to write small notes on what they love about Christmas. Or perhaps your children could draw pictures to represent each day. The possibilities are endless!
