Freshen Up Your Morning Routine With These Modern Shower Heads
Worth waking up for.
Desperate to upgrade your existing shower head? Or perhaps you're renovating your bathroom and simply need a new model? Whatever the reason, our shower head buying guide answers all your burning questions. In it, we cover everything from shower head types, installation and removal. Read on to find out more.
Overview:
Popular Shower Head Types
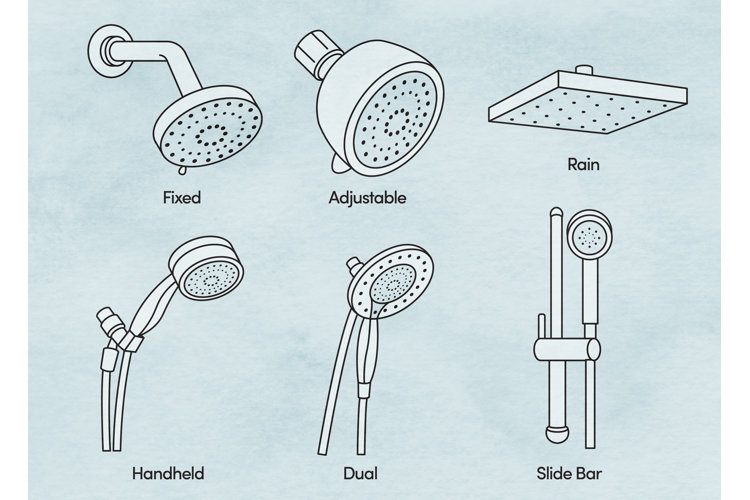
There are a plethora of shower head types to choose from, so before you go removing or change your shower head, you might want to brush up on all the different shower head types first.
Fixed Shower Heads
These are the most standard style with just a shower head attached to a shower arm or faucet hole in the shower wall. The spray options do not change.
Dual Shower Heads
This style comprises both a fixed shower head and an attached handheld shower for multiple bathing and use options.
Adjustable Shower Heads
Attached to a fixed mount, you can adjust the spray options easily by turning the shower head clockwise or counter clockwise.
Rain Shower Heads
An eco-friendly option, rain shower heads are usually ceiling-mounted, use less water than other shower heads and feature a low-flow spray to imitate the relaxing feel of rainfall.
Handheld Shower Heads
The shower head sits in a fixed mount but is attached to a short hose that allows for easier bathing.
Slide Bar Shower Heads
A useful combination of adjustable and hand-held shower heads, slide bar showers are adjusted by moving the shower head mount vertically on a fixed pole – accommodating bathers of all heights and abilities.
Flow Rate Level
Flow rate Opt for a low-flow shower head for more energy savings. According to government regulations, the highest flow rate allowed for shower heads is 2.5 gallons per minute at a standard water pressure level of 80 psi (pounds per square inch).
Tip: Check your home's water pressure levels before selecting a shower head type for the best results. If you have lower water pressure levels, look for a low-flow shower head.
Shower Head Spray Patterns
Rain: A low-flow pattern with a larger shower head and a light pressure that mimics rainfall.
Massage: Several pressure options with higher pressure settings for massage-like relaxation.
Full: One or two pressure options that utilise all of the shower head holes.
Jet: High pressure water pattern with a concentrated stream option.
Pause: Medium pressure with an on-and-off water pattern.
Shower Head Installation Type
Shower heads are wall-mounted or ceiling-mounted, depending on your existing plumbing set-up.
How to Install a Shower Head
What’s Included?
When shopping for a new shower head on Wayfair, be sure to check the Product Overview Description to see what will be included in your new shower head.
What You'll Need:
- Adjustable wrench
- Slip-joint pliers
- Teflon tape
Step 1: Close Drain
Close the drain or place a towel over it to avoid parts falling down the drain while you work.
Step 2: Remove the Old Shower Head
Remove the old shower head. Some shower heads can be removed by hand. Others may require you to use slip-joint pliers to hold the shower arm (the piece that protrudes from your wall) in place while you use an adjustable wrench to remove the old shower head. We recommend placing a towel under the pliers to ensure you don’t scrape the finish off. Then with a rag, clean off any rust, mineral deposits or old sealant.
Step 3: Tape the Threads
Take Teflon tape and wrap it in a clockwise direction (two to three times) around the threads (the grooves) at the end of the shower arm. Press the tape into the threads. This helps keep them watertight.
Step 4: Follow the Directions for Your Type of Shower Head
Follow the below directions for the type of shower head you are installing: fixed, adjustable, hand-held, dual, slide bar, or rain.
Fixed & Adjustable Shower Heads
What You'll Need:
- Adjustable wrench
- Teflon tape
Step 1: Screw the New Shower Head On
Screw the new shower head clockwise onto the shower arm extending from the shower wall. You may need a wrench to tighten it. If your shower head comes with a washer, place that inside the shower head bracket before screwing it on to the shower arm.
Step 2: Check for Leaks
Turn the water on and check for leaks. If there are leaks, use Teflon tape to cover them or wrap more Teflon tape around the threads of the arm.
Handheld Shower Head
What You'll Need:
- Adjustable wrench
- Teflon tape
Step 1: Connect the Mount to the Shower Arm
First screw the shower head mount onto the arm. You may need a wrench to tighten it. The mount is designed to have a spot for the hand-held shower head to sit and two openings: one for the shower arm and one for the hose.
Step 2: Connect the Hose
Then connect the shower hose to the mount and to the hand-held shower head. If your shower hose comes with a washer, place that inside the hose before screwing it on.
Step 3: Place the Shower Head in the Mount
Step 4: Check for Leaks
Turn on the water. Check for leaks. If there are leaks, use Teflon tape to cover them.
Dual Shower Head
What You'll Need:
- Adjustable wrench
- Teflon tape
Step 1: Attach Diverter
Find the diverter that routes the water between the fixed part of the shower head and the hand-held piece. Attach that to the shower arm. If your shower head comes with a washer, place that inside the head's bracket before screwing it on with the wrench.
Step 2: Install Fixed-Mount Shower Head
Take the fixed-mount shower head and screw it onto the end of the diverter.
Step 3: Attach Hand-Held Shower Head
According to the manufacturer’s directions, attach the handheld shower head to its mount.
Step 4: Connect the Shower Hose
Connect the flexible shower hose to both the diverter and the hand-held shower head. If your shower hose comes with a washer, place that inside the hose before screwing it on.
Step 5: Check for Leaks
Turn on the water. Check for leaks. If there are leaks, use Teflon tape to cover them.
Slide Bar Shower Head
What You'll Need:
- Adjustable wrench
- Teflon tape
- Power drill
- Caulk/sealant
- Flathead screwdriver
- Phillips screwdriver
- Level
- Mounting screw (typically provided by manufacturer)
- Plastic anchor (typically provided by manufacturer)
- Hex wrench (typically provided by manufacturer)
Depending on the style you choose, a slide bar shower can be installed in many different ways. Some include suction cups and a hose that can be connected to your current shower arm, while others require new drill holes in your shower walls, sealant and a separate plumbing line. For any plumbing changes or drilling, we recommend consulting the manufacturer's directions and your plumber or contractor.
If you choose to install the bar yourself, remember that most shower heads sit at a height that is about 72–78 inches off the ground. Make sure the hose has slack so it can be adjusted as necessary and still reach the top of the bar. As with every shower head installation, consult the manufacturer’s directions. The steps below are general guidelines.
Suction Cup Installation
Step 1: Assemble Pieces per Manufacturer’s Directions
Step 2: Install Slide Bar
Place the slide bar where you want it. Use a level to ensure that it is straight. Press suction cups on each end of the bar into place.
Step 3: Connect the Hose
Connect the hose to the shower head. Connect the other end of the hose directly to the shower arm. If you have a dual shower head, connect the diverter to the shower arm, reattach the original shower head and then connect the hose to the diverter.
Step 4: Attach Shower Head
Attach the shower head to the bar and slide it to its desired height.
Non-Suction Cup Installation
Step 1: Assemble Parts
Assemble the parts per manufacturer’s directions. In some cases, you may have to disassemble parts before reassembling them correctly.
Step 2: Mark Location of Shower Bar
With a pencil, mark the new location of the shower bar on the shower wall. Use a level to ensure it is straight. Make sure to install the shower head in a place where the drill will not pierce the current plumbing supply – causing a leak. We recommend placing it about half a foot to one foot away from your old shower arm and bath faucet. Place it on the side closest to the corner that does not hold the shower curtain.
If you are unsure about your current plumbing or want it in the center of your shower, ask a professional for installation help.
Step 3: Drill Holes
Drill holes on the pencil marks in shower wall. Use a power drill and bit that is designed for your shower enclosure material such as tile, marble, fiberglass or acrylic. Drill a pilot hole for each screw that is needed to attach the slide bar to the shower wall. Then insert plastic anchors.
Step 4: Secure Top Post
Secure the top post with mounting screws provided. You will need your screwdriver and silicone caulk. You may need to remove the decorative cap to screw the post into place. Once it is secure, replace the decorative cap to hide the screw.
Step 5: Install Slide Bar
Put the slide bar into place.
Step 6: Secure Bottom Post
Now take the bottom post and repeat the same steps as the top post.
Step 7: Attach the Shower Head to the Bar
Rain Shower Head
What You'll Need:
- Adjustable wrench
- Teflon tape
If you want the shower head to extend from your ceiling, we recommend having a professional install it since it will involve adding or adjusting plumbing.
If you don’t plan on completely reconstructing your shower to have the rain shower extend directly from your ceiling, then choose a rain shower head that can be attached to your existing shower arm with an extender or a rain shower head that comes with a matching shower arm. Follow the steps below.
Step 1: Attach Shower Arm or Extender
Depending on the style you choose, you will have to screw the new shower arm to the plumbing in your wall or you can screw an extender to your current shower arm. The extender lengthens the arm so the shower head sits in the middle of your shower and provides the same feeling as if it was installed from your ceiling.
Step 2: Wrap Teflon Tape Around Threads
If you have an extender, wrap Teflon tape around the other end of the extender. If you have a new shower arm, wrap Teflon tape around the threads at the end of the arm.
Step 3: Attach Shower Head
Attach the rain shower head to the end of the extender or the shower arm.
Step 4: Check for Leaks
Check for leaks at the connection. If there are leaks, use Teflon tape to cover it.
