How to Create a Vertical Garden
DIY garden wall ideas to do this Spring.
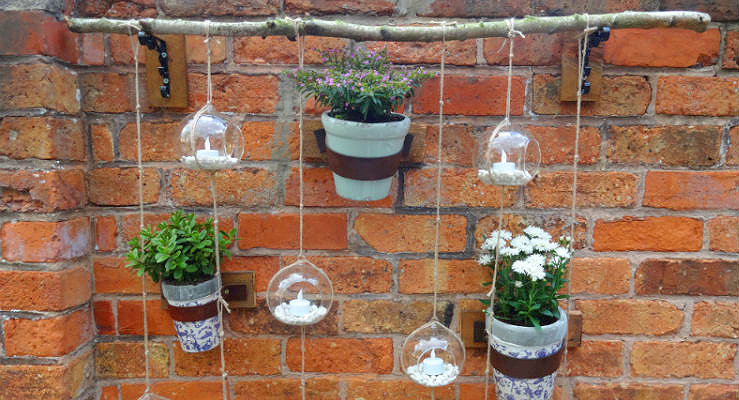
Create a sweet spot in your garden with this handy DIY from UK-blogger, Kezzabeth. Helping you to savour a small corner of your outdoor space for when you need a little r&r, the DIY vertical garden is simple, requires just a few tools and looks great.
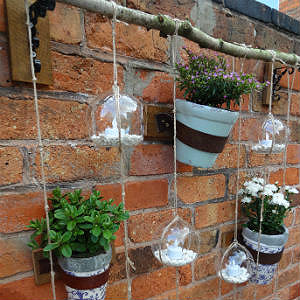
A vertical garden works great for any size of garden or outdoor space. From balconies, patios and even a side alley, creating your very own DIY hanging planter comes with a multitude of benefits. Use yours to add some visual appeal, grow your own vegetables, herbs or even something from this list of superfoods, the choice is yours. Follow DIY blogger, Kezzabeth's simple steps to creating your next vertical garden here:
What You'll Need to Create Your Vertical Garden
- Pre-treated wood
- 2x old leather belts
- Scissors
- Wall plugs and screws
- Drill, saw and screwdriver
- 4x plant pots
- Twine
- Superglue
- 6x glass hanging pots
- 2x thick branches (sourced from nearby woods)
- 2x small shelf brackets
- 2x large garden rocks
- Decorative garden stones
- LED tea lights
Before you start to create your vertical garden, browse our selection of plant pots, planters , wall planters and hanging baskets for more garden ideas.
DIY Veritcal Garden - Step-by-Step Guide
1. Step - Affixing the Plant Pots
- Cut the pre-treated wood to size. Tailor each piece to the size of your plant pots by measuring the diameter of each pot then adding an extra 10cm. This will give you the exact length of the wood you need.
- Drill holes into each piece of wood, then hold up against a wall and mark out the holes using a pencil.
- Drill the holes into the wall and insert wall plugs before using screws to firmly attach the wood.
- Attach each leather belt by screwing right through it into the wood at either side of the plant pot. You may need a helping hand to hold the plant pot in place whilst you do this. Make sure the belt is nice and tight and if need-be, use multiple screws on each side for any slightly larger or heavier pots.
- Trim off any excess leather. Now you can start to fill the post with your plants.

2. Step - Affixing the Branch
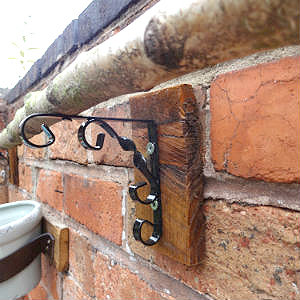
- The branch will be where your glass terrarium will hang from. To affix it to the wall, I'm using regular shelf brackets. Make sure the brackets you're using are long enough to allow the glass terrariums to hang properly, without being too close to the wall. Use the same technique as above for attaching the plant pots. Drill into the wall, insert the wall plugs and attach with screws.
- The branch can then be screwed directly onto the bracket through the holes underneath. Make sure to use smaller screws for this, as you don't want to split the branch.
3. Step - Affixing the Glass Balls to Your DIY Hanging Planter
- To attach the glass terrariums, wrap some twine around them, pulling each end through the hole at the top.
- Pull the twine back around the terrarium and tie a tight knot at the bottom. Make sure that it's tight enough so the glass terrarium won't slip out. To secure it further, add a dab of super glue either side of the terrarium, underneath the twine. This will stop the twine from moving altogether.
- Tie some more twine through the loop at the top and then tie it to the branch.
4. Step - Securing the Glass Balls
- To stop the glass terrariums from swinging in the wind, firmly secure to the ground by adding a second branch. To do this, attach more twine to the bottom of the terrarium and tie it to the second branch. Make sure this is tied relatively tight so that there is little-to-no swing.
- Weigh the branch down onto the floor with two rocks either side to stop it from being moved.
5. Step - Decorating Your DIY Hanging Planter
- Add some decorative stones and LED tea lights - just don't forget to bring them back indoors when not in use. Finally, add a rug, some seating and sit back and relax with a good book in your new garden retreat.
And there you have it - a DIY vertical garden to enjoy this Spring/Summer. If you enjoyed this outdoor DIY, then discover more garden ideas and inspiration over in the garden section of Ideas & Advice. Shop even more outdoor furniture here.
Images c/o Kezzabeth
