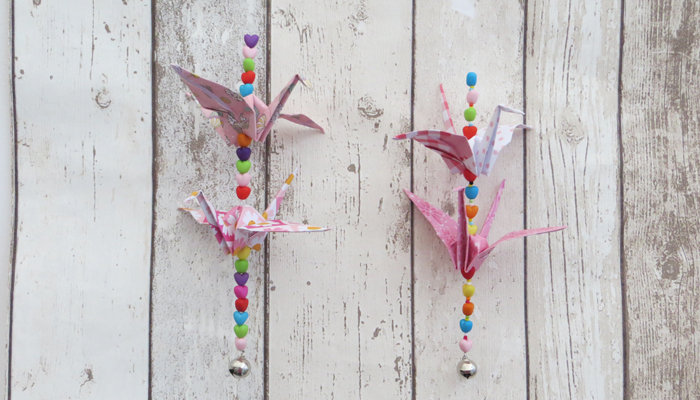
DIY Origami Crane Door Hanger
Add colour to your home with these beautiful origami paper crane door hangers.
Origami is such a beautiful Japanese art that has endured for over a thousand years. Using printed paper you can create the most beautiful artwork like paper animals or even a paper table. Why not try origami and create personalised artwork or a gift for your family and friends?
Whether to spruce up plain doors or for an alert when someone opens it, a beautiful crane door hanger will bring wow-factor to your home. You can even add a bell to make it ring each time someone opens the door.
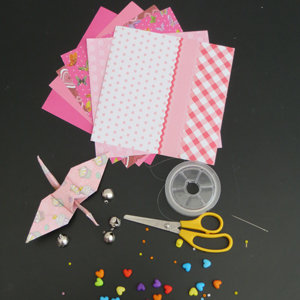
This project will take 30 minutes to an hour and requires minimal material.
You'll need:
- Origami paper/square coloured paper 6' x 6'
- Clear beading thread
- Beads and bells
- Scissors
- Needle
How to Fold an Origami Crane:
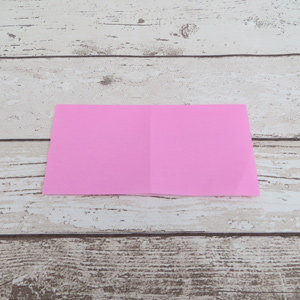
Step 1.
Fold the square paper in half, into a rectangle. Then unfold and fold it in half the other way.
Step 2.
Fold the top right corner down to the bottom left corner. Unfold, and fold the top left corner down to the bottom right corner.
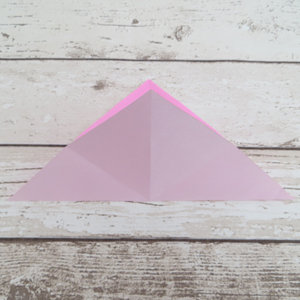
Step 3.
Bring the lower right side of the top flap to the middle line. Repeat on the lower left side (to the middle line).
Step 4.
Fold top triangular flaps into the middle crease and unfold. Repeat the same on the left side. Turn it over and repeat the same steps on the other side.
Step 5.
Fold down the top corner to make the crease lie along the horizontal line created by the previous step.
Step 6.
Open the uppermost flap of the model, bringing it upwards and pressing the sides of the model inwards at the same time. Flatten down, creasing well. Repeat the same on the other side.
**Step 7. **
Fold top flaps into the middle and repeat the step on the other side.
**Step 8. **
Inside, reverse fold the paper along the creases you just made. These will be the head and tail. Fold one side to make a head, then fold down the wings.
- For a visual demonstration of how to fold the crane and create the hanger, watch Eileen's step-by-step video here.
How To Make An Origami Crane Door Hanger:
Step 1.
Cut a piece of clear beading thread to about 80 – 100 cm. Bend it in the middle to form a loop and tie a few knots.
Step 2.
Slide the beads into the thread according to your own liking. When you have finish beading it through, tie a few knots at the end of the beads to secure it.
Step 3.
Thread the clear thread into the needle and thread it through the top of the first paper crane's body and out from the bottom hole.
**Step 4. **
Next, slide on more beads, then the second paper crane, followed by more beads into just one of the clear beading thread. You can make more than 2 tiers of paper cranes, just remember to cut extra length of the clear beading thread. When you reach the end, just thread on one clear beading thread.
**Step 5. **
Loop the bell and slide it up towards the beads.
Step 6.
Once you reach the top of the beads/the bottom of the second paper crane, use the other clear beading thread to tie a knot with the other thread. Trim off any excess clear beading threads.
Now they are ready to hang!
