Handmade roman blinds for the nursery
Learn how to sew your own blinds with this tutorial
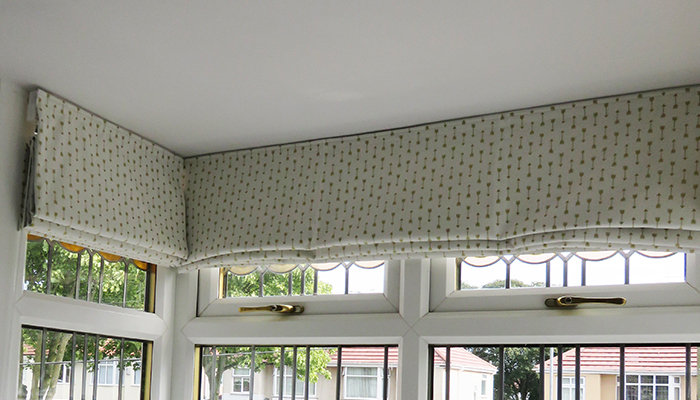
I’ve been on a mission to create a unique nursery for our first baby, due in November, and with a passion for interiors and DIY this was the perfect opportunity for me to get creative! When I came across some fabric which fitted my geometric tribal theme perfectly, I knew exactly how I’d use it in the nursery, so I bought the fabric and set about making some bespoke roman blinds for our little bay window. Here I’m sharing my tutorial with everyone, as it’s easier than you might think and the end result can be so effective!
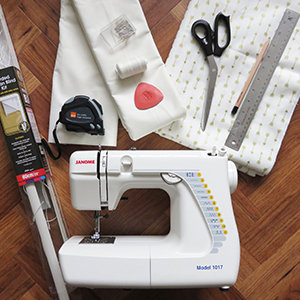
Equipment
• Fabric
• Lining fabric (blackout if required)
• Fabric scissors
• Cotton to match the fabric
• Cotton to match the lining (if colour is different to the fabric)
• Tape measure
• A long ruler
• Tailor’s chalk
• Pins
• Sewing machine
• Roman blind kit (you can buy everything individually but a good Roman Blind Kit is much easier and has everything you need)
Measure your windows to get the exact size of the blind when it’s all finished and opened up in the space, minus a couple of centimetres either side so that the blind doesn’t drag down the walls.
Measure and cut your fabric. Start with the exact size of the finished blind then add a total of 3cm either side, 2cm at the top and 5cm at the bottom. Mark out the hems as per image 2 below using tailor’s chalk, on the back of the fabric.
Measure and cut your lining fabric. Start with the exact size of the finished blind then add 2cm to the top, as per the image below. Mark out hems using tailor’s chalk, on the back of the lining.

Fold each piece in half length ways to find the centre of each piece of fabric, and at the very top make a little snip with the fabric scissors to mark the centre – this tip helps you keep the fabric and the lining lined up and is even better if you keep the fabrics pinned together at this point.
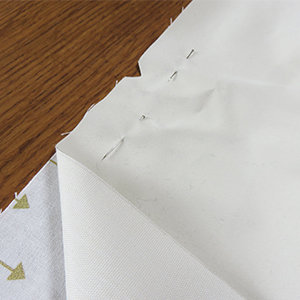
With right sides together (right sides = the side of the lining to face the window, and the side of the fabric to face the room) and with both of the pieces lined up at the top, using your centre snips as the guide, pin the long edges together along the 1cm hem drawn in chalk on the fabric . If the fabric feels baggy on top of the lining when it’s all pinned, you’ve done it right, trust me.
Sew along the 1cm hem line down each side, keeping it as straight as possible. Remove the pins then turn inside out and flatten out the fabric on top of the lining. You will find that the excess fabric has wrapped around to create a 2cm border at either side of the lining, which is a nice finish for the blind.[Image 4]7. Iron flat to get these borders nice and neat, the finished piece should have crisp pressed edges and be the exact width of the window (the exact width of the lining fabric, as per image 2).[Image 5]
The top edge
Moving to the top of the blind, the fabric and lining should still be aligned at the top using your centre snip, so using the hems you marked out at the start, fold down both layers by one centimetre, then again by another centimetre to create a neat double hem. Pin this down.[Image 6]
Take a length of the loop tape (this will be provided in the Roman Blind Kit, or can be bought separately from any haberdashery) and trim it to just a centimetre less than the width of the blind. Position centrally on the blind, around half a centimetre from the top of the blind. It should be half covering the double hem you’ve just made. Pin the loop tape down.
With the sewing machine, sew one straight line close to the top of the loop tape, securing both the tape and the double hem. Then sew another straight line running parallel, along the bottom edge of the loop tape. Make sure the thread in the bobbin matches the front fabric and the main thread in the machine matches the lining as the stitching will be visible from the front of the blind.
The bottom edge
Move to the bottom of the blind, where the fabric should be 5cm longer than the lining, including a 1cm hem at the very bottom which you drew up in stage 5. Now is a good time to check the measurements as the top of the blind down to the bottom of the lining should be the exact drop of your final blind.
Fold the fabric hem 1 cm upwards (it always helps to iron press this to keep the hem straight and neat), then fold the fabric up again to cover the bottom 4 centimetres of the lining and to create a 4cm deep pocket. Pin in place, then sew along the top of the pocket that you just created to secure the pocket in place. Hand sew a hidden stitch at one end of the pocket to seal it closed.[
- Take the thicker plastic bar which you will find in the Roman Blind Kit, and cut to size – a couple of centimetres shorter than the final width of the blind. Insert the bar into the pocket then seal the other end closed with another hidden stitch.
The rods and pleats
- When laid flat the fabric should now be the exact width and length of your final blind. To work out where the rods and pleats should be, see image 11 and use the following guidelines – I’ve given the example based on my own blind:
a. Take the drop of the blind and minus 6cm (5cm to avoid the headrail, 1cm clearance at the bottom of the blind).E.g: 130cm – 6cm = 124cm
b. A roman blind is made up of a series of half pleats, of which there are always an odd number. Half pleats are usually between 20-40cm deep (but all the same size), depending on the drop of the blind and how deep you want the pleats to be. You can work out how many half pleats would be right for your blind by dividing the answer to point A by the approximate depth you would like your half pleats to be. Round it up to the closest odd number to get the number of half pleats you need.E.g: 124cm ÷ 20cm = 6.2cm rounded up to 7 half pleats.
c. To get the exact depth of each half pleat, divide the answer to point A by the number of half pleats you need.E.g: 124cm ÷ 7 = 17.7cmd. Start at the bottom of the blind and measure upwards, using tailors chalk to draw a straight line across the blind where each half pleat should go. Measure carefully to make sure each half pleat is perfectly straight and parallel across the blind – any uneven lines here will cause the blind to lift and lower quicker on one side than the other.e. The rods should be positioned at every other half pleat, starting at the one closest to the bottom of the blind.
Take the rod tape provided in the Roman Blind Kit and trim to size - cut to the full width of the fabric then turn the tape under 1cm at one end. The rod tape should sit with the pocket at the bottom and the loops facing outwards and there will be room along the top of the tape, above the pocket, to sew a straight line. Position, pin and sew the tape directly on top of the rod line you just measured out, sewing through both the lining and the fabric.
Take your rods and if they have caps at the end remove them, cut the rods to the right length (just short enough to fit inside the rod pockets), put the cap back on and insert the rod into the pocket. Then fold the open end of the rod pocket under and hand stitch it closed to complete your straight and secure rod pocket! Repeat for all rods, remember you should have an odd number of pleats and an odd number of rods in your final blind.
Once all of your rods are in, you can start to connect your blind to the frame, which will come as part of the Roman Blind Kit. The headrail might need cutting to size to fit your window, so just make sure the final cut headrail matches the final blind width.
Follow the instructions in the Roman Blind Kit for connecting the blind to the frame, and for then connecting the frame to the brackets on the window.
Once the blind is fitted to the frame and connected to the wall, if the blind is lifting unevenly just tweak the tightness of the ropes until you hit the sweet spot and they’re all equal and lifting nicely. For the first few times you might need to smooth out the pleats as you lift, but over time they will naturally fall into place.
Finally, make sure you have cleat hooks installed to the wall next to the blind so you can wrap the cord securely away once you’ve lifted or lowered the blind – this is particularly important when children are around.Then sit back and admire your finished handmade blinds!
Bio
I’m Sarah Lynch and I started From Day Dot blog at home in Liverpool when I found out I was pregnant with my first baby, using it as a diary of my pregnancy and a place to share any tips and inspiration for other Mums, parents-to-be, or anyone else with a love for DIY and interior decor.
All images provided by From Day Dot
