How to Make A Recipe Organiser From A Bread Bin
Turn a bread bin into a retro-inspired recipe organiser with this tutorial from craft blogger Motte...
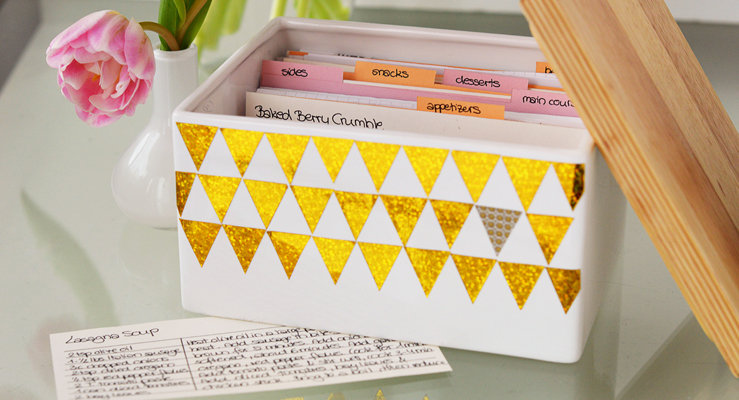
Image: Motte's Blog
Spring has officially begun which means it is time for sunshine, flowers, pastels, baking...and spring cleaning, I guess. So why not combine some of your spring-time favourites by turning a standard bread bin into a personalised recipe collector? Keeping your recipes organised and ready for grabs in a DIY pastel recipe organiser is kind of a spring cleaning essential, isn't it?
Materials:
- Bread bin by Continenta, or similar
- Self-adhesive craft paper (colour your choice)
- Cardboard paper, white
- Cardboard paper, colour of your choice
Tools:
- Ruler
- Scissors or craft knife
- Pen
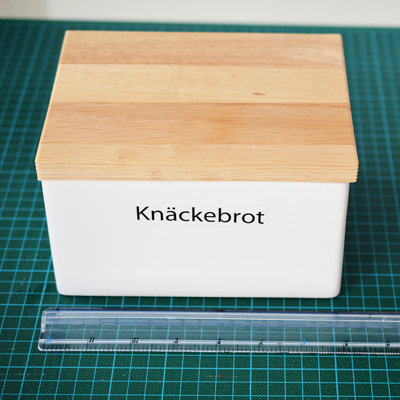
Image: Motte's Blog
**Step Two: **
Cut a bunch of isosceles triangles from the self-adhesive craft paper.
If you'd like all triangles to have the exact same size, create a template from a sheet of paper.
Step One:
Start by removing any stickers from the bread bin if desired. I actually kept mine in place. That way, if I ever want to change things up I can convert the bin back to its original purpose. If you are leaving the sticker in place, turn the bin around so you are now working on the back of the bin for the remainder of the project.
Measure the width and height of the bread bin as a reference. Any recipe cards and dividers should fit inside nicely once the lid has been shut. All measurements provided in this tutorial are based on the measurements of the Continenta bread bin.
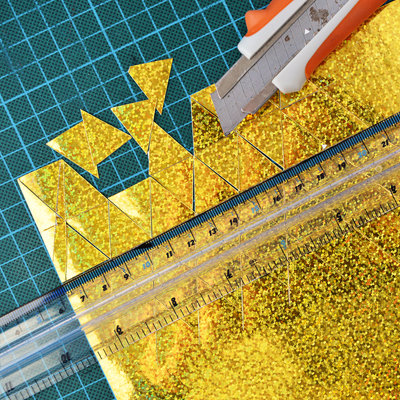
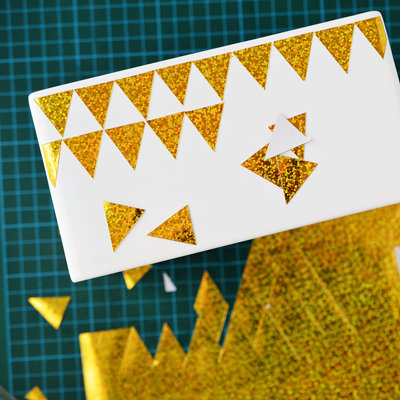
Image: Motte's Blog
Step Three:
Place the triangles onto the bread bin to figure out the placement, then peel back the protective sheet and fix into place.
Step Four:
Continue by making the dividers from cardboard paper in the colour(s) of your choice. I opted for a light pink and orange tone.
From the cardboard paper, measure and cut a 16 x 7.2cm rectangle adding a 0.6 x 4cm tab on top.
Make as many dividers as necessary varying the position of the tab. This way they won't cover each other up once the dividers have been placed behind one other.
Image: Motte's Blog
Use a craft knife and ruler rather than a pair of scissors for a straighter edge.
Step Six:
From the white cardboard paper cut 16 x 7.2cm rectangles for the recipe cards.
Using your ruler and a pen, add some space for the ingredients and instructions of each recipe.
Image: Motte's Blog
Step Seven:
Start filling in the recipe cards with your favourite, go-to recipes. Continue on the back if necessary
Step Eight:
On the tabs of the dividers add the collection categories of your choice. I made tabs for breakfast, lunch, appetizers, main course, sides, snacks, desserts and beverages.
You could also add categories like second breakfast, canapés, brunch and tea, or make completely different classifications: breads, salads, soups, pasta, pies, holiday baking…
Image: Motte's Blog
Step Nine:
Place the dividers and recipe cards inside your very own bread bin recipe collector and arrange as desired.
Add other recipes that you cut out of magazines or quickly scribbled onto a piece of paper that one time and desperately need a place to live.
Happy collecting, organising and of course, cooking!
Image: Motte's Blog
