Measuring and Mounting a Ceiling Fan Made Easy With This Guide
Keep your cool when mounting a ceiling fan.
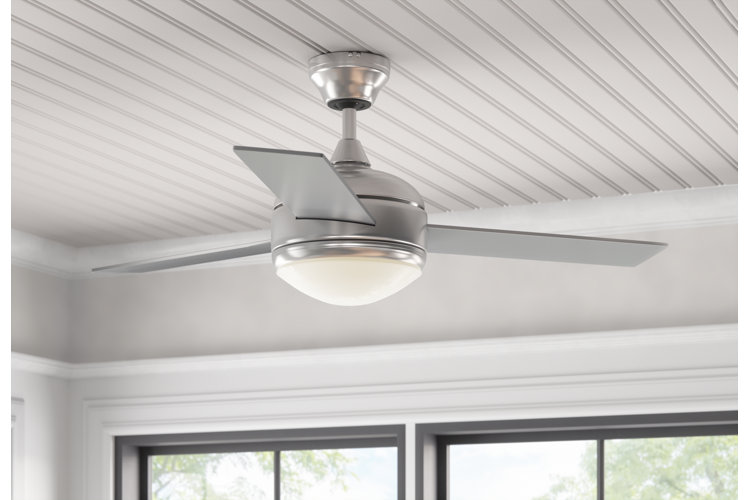
A ceiling fan is the perfect way to cool down your home and looks great in any room. Follow our step-by-step guide to learn how to mount a ceiling fan once you've found the right one for you.
Jump To:
Before You Buy
How to Install a Ceiling Fan on a Flat Ceiling
How to Install a Ceiling Fan on a Sloped Ceiling
How to Measure Ceiling Slope
Before You Buy
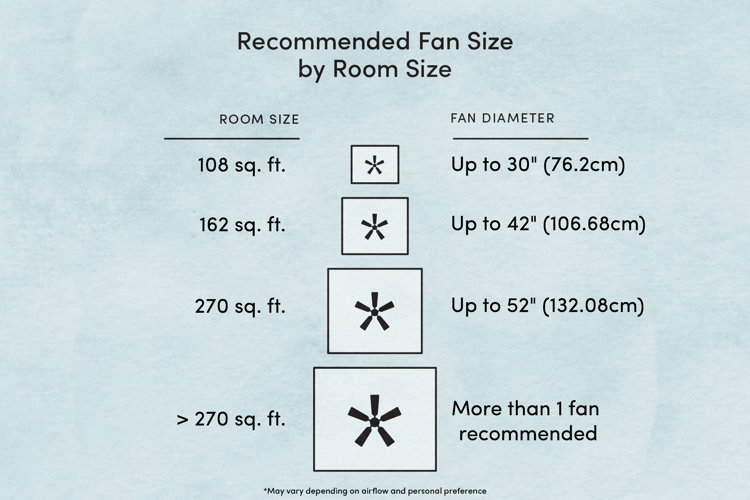
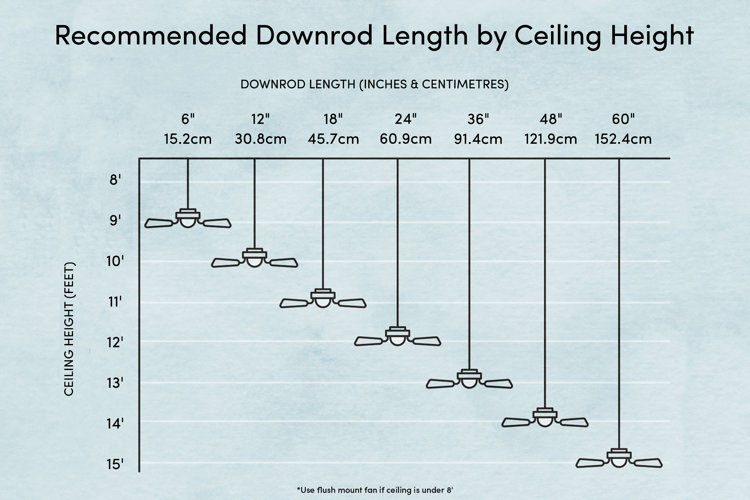
To find the right downrod length and size of your new ceiling fan, measure the length, width and ceiling height of the room you plan on mounting it.
Ceiling Fan Parts
Before mounting a ceiling fan, it's important to understand all the parts of a fan.
How to Install a Ceiling Fan on a Flat Ceiling
If you're replacing a ceiling fan with a similar style, installation should be simple. If you are putting in a new ceiling fan or replacing an existing light with a ceiling fan, make sure the power required to operate the fan will not overwhelm the existing wiring. Consult a contractor if you are unsure.
What You'll Need
- Screwdriver
- Pliers
- Wire nuts
- Ladder
- At least two people
Step 1: Turn off Electricity to Room
Turn off the electricity to the room where you're mounting the ceiling fan. Confirm the power is off by flicking the light switches. Remember which switch controls the fan for testing purposes later.
Step 2: Remove Blades
With a screwdriver, remove the blades of the existing fan.
Step 3: Disconnect and Remove Fan
Unscrew the screws at the base of the fan where it meets the ceiling. Pull the cover down away from the wires. Remove the wire nuts and the connections between the fan and the wiring. The entire fan will come out of the ceiling so be ready to support its weight. Unscrew the brackets that support the ceiling fan.
Step 4: Consider Your New Fan
If your new ceiling fan is heavier than your existing model, consider installing a support bracket that will sit between the ceiling joists. If you choose to use a support system, you will also need to insert a mounting box and electrical plate into the hole, and use bolts to secure it in place. This will be used later to attach the ceiling fan mounting plate.
Step 5: Attach Mounting Plate
Attach the new mounting plate to the electrical box. Make sure the flat side is up. Feed the electrical wires through the centre hole of the mounting bracket or plate. This piece and installation screws will be included with the ceiling fan set.
Step 6: Assemble the New Fan
According to the manufacturer's directions, assemble the fan and downrod on the floor.
Step 7: Connect Fan and Wires to Ceiling
Insert the fan into the supports and connect the wires to the fan. Depending on the number of switches you have, you may need to connect all the wiring (the power and lighting) to one all-purpose wire and use the chains on the unit to control speed and lights. Screw wire nuts into the wires, put the wires back into the electrical box, and secure the canopy that hides these wires and the mount. Most wires will match up in colour. For example, a white wire from the fan or ceiling will be connected to white wire from the receiver.
Step 8: Connect Pull Chain
If the pull chain is not already connected or wasn't connected during the assembly of the fan, make sure to connect it now.
Step 9: Test it
Test the switches to make sure the fan and lights work correctly.
How to Install a Ceiling Fan on a Sloped Ceiling
When installing a ceiling fan on a sloped ceiling, you may need to buy a longer downrod than the one that comes with the fan to ensure that the blades are at least 18" (or 45.72cm)from any wall or ceiling. If your ceiling angle is greater than 30°, you will need to buy an angled mounting kit, which is sold separately.
How to Measure Ceiling Slope
What You'll Need
- Tape measure
- Ladder
- Paper and pencil
- Straightedge
- Protractor
Please note that each fan manufacturer has different installation instructions, so we recommend following those or consulting a professional. You can follow the general instructions below.
Step 1: Draw a Picture of Your Room
With paper and pencil, draw a picture of the room.
Step 2: Measure Tallest Part of Your Ceiling
Using a ladder, measure the height of the tallest part of your ceiling – which may be directly in the middle of the room or off to the side. For later use, place a piece of painter’s tape on the floor directly below the tallest part of the ceiling (at the end of your tape measure).
Step 3: Measure Your Walls
Measure your walls – from the floor to where the wall meets the ceiling.
Step 4: Calculate the Rise of Ceiling
Subtract your wall measurement from the ceiling height measurement to get the rise of your ceiling.
Step 5: Calculate the Run of Ceiling
Go to the painter’s tape from step one – which should be sitting directly under the tallest part of the ceiling. Now, measure from this point along the floor to the wall. This is the run of your ceiling.
Step 6: Convert Your Measurements
Convert the measurements from feet to inches for the draft of your room. For example, if the rise of your ceiling is 11', record 11". If the run of your ceiling is 9', mark this down as 9". If you’re working in centimetres, you’ll want to convert from imperial to metric (11" = 27.94cm, 9" = 22.86cm).
Step 7: Figure Out the Ceiling Pitch
Using a ruler, draw a triangle on the piece of paper. The horizontal line is the length of your converted run measurement. From the example in step 6 this would be 9" (or 22.86cm). On the left side of this line, draw a line straight up (90 degrees on the protractor) that is the length of the converted ceiling rise measurement (11" or 27.94cm). Now, connect the two ends of the lines to create a triangle.
Using the protractor (place the centre point at the corner of the sloped line), look at the angle that is formed between the bottom line and the sloped line on the right. This is the angle of your ceiling's pitch.
Ceiling Fan Installation
The installation is the same as a regular ceiling fan, the only difference is the assembly of the new fan and its mount. Each fan manufacturer has different installation instructions, so we recommend following those or consulting a professional. However, below are general steps to follow.
Step 1: Assemble the Fan
According to the manufacturer's instructions, assemble the fan and blades.
Step 2: Attach the Ball and Downrod
Take the downrod and screw it into the threaded end of the ball provided (the ball uses gravity to make the downrod sit straight up and down). Slide the ball and downrod through the bracket. Thread the provided pin through the holes to lock the downrod into place. Line up the pin with the grooves in the ball and lock it into place.
Step 3: Thread the Wires
Run the electrical wires from your ceiling fan through the downrod and out the other side.
Step 4: Secure the Downrod to the Ceiling Fan
Screw the downrod into the top of the ceiling fan. Then tighten any additional mounting screws.
Step 5: Attach the Downrod to Ceiling Bracket
Place the other end of the downrod (the end with the ball) into the mounting bracket that will be placed on the ceiling.
Step 6: Connect Wires and Mount Bracket to Ceiling
Connect any electrical wiring and mount the bracket to the ceiling.
Tip: For more expert advice on ceiling fans, check out:
- Things to Look for When Buying a Ceiling Fan
- Do You Know Which Direction Your Ceiling Fan Should Be Spinning?
