Kids' DIY: Snowy Village Advent Calendar
Let your kids discover the excitement of new surprises every day with the help of a magical DIY advent calendar.

*Image: *Keep Up With The Jones Family
On November 1st, I bought a chocolate-filled advent calendar. In fact, I bought four. One for each boy and one for my husband. I never bought myself a calendar—I didn't buy one last year either. And why? Nostalgia. My own childhood calendars were so memorable—little windows, beautiful illustrations. No need for chocolates; discovering what lay behind the closed window was enough. I truly wanted my boys to feel the same excitement I did each advent, so I decided to make my own. With three boys it needed to be sturdy and fun to use. I called my dad, told him my plans and without further ado, here's how we did it.
You will need:
• Saw (circular or otherwise)
• Pine planks
• Wood glue or hot glue
• Glitter paint
• White base coat paint
• Artificial snow
• Crystal number stickers
Tip—You could make the little houses out of balsa wood, which wouldn't require the amount of sawing, just snipping with scissors!
Step One:
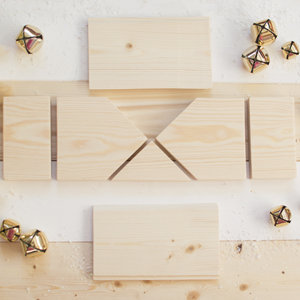
Draw a plan of how large you'd like your houses to be. We used thick pine planks (68mm) for the walls and thinner ones for the rooftops as they had little ledges on them.
Step Two:
Cut the wooden planks according to your measurements. We actually made one of the houses bigger for Christmas Day, but that's entirely up to you!
Step Three:
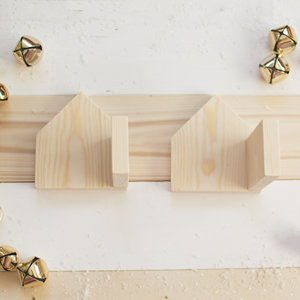
Glue the sides of each individual house together. Make sure they're level and that you're sticking the correct pieces together! We glued them as in the picture—two sides at a time and then joined the two halves of the house together.
Step Four:
Now glue the rooftop halves together and when everything is dry, stick the rooftops onto the main buildings.
Step Five:
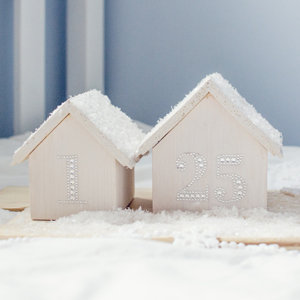
Paint the houses! We used a base coat so that you can still see the grain of the wood but without having the "baked bean" colour of pine take hold as they age. Then we added a coat of gold glitter and one of silver to the rooftops.
Step Six:
Add the artificial snow. We got ours at the bargain shop and it was so much fun to sprinkle everywhere.
Step Seven:
Add another layer of glitter paint or glitter glue to make sure the rooftops sparkle through the iridescent snow.
Step Eight:
Apply your numbers. We lined up the houses as we completed them to ensure the numbers were all applied in a line and there were no dips or out-of-line stickers.
Step Nine:
Underneath each house, we're leaving a little paper scroll with a challenge or treat written on it for our boys to complete or enjoy each day of advent.
We hope you have just as much fun with yours as we've had with ours!
