The Best Food Thermometers for Perfectly Cooked Meat
Your guide to the best food thermometers.
A food thermometer is a must-have for measuring the internal temperature and cooking stage of meat and egg products. They're also essential devices for measuring the temperature of hot oil, caramelising sugar and monitoring the temperature of your grill or oven. In this guide, learn about the various types of food thermometers and how to properly use one, to discover the best food thermometers for you.
Overview:
Display Type
Measuring Technology
Food Type
Cooking Method
Additional Food Thermometer Features
How to Calibrate Your Cooking Thermometer
How to Use a Food Thermometer
Safe Minimum Cooking Temperatures
Display Type
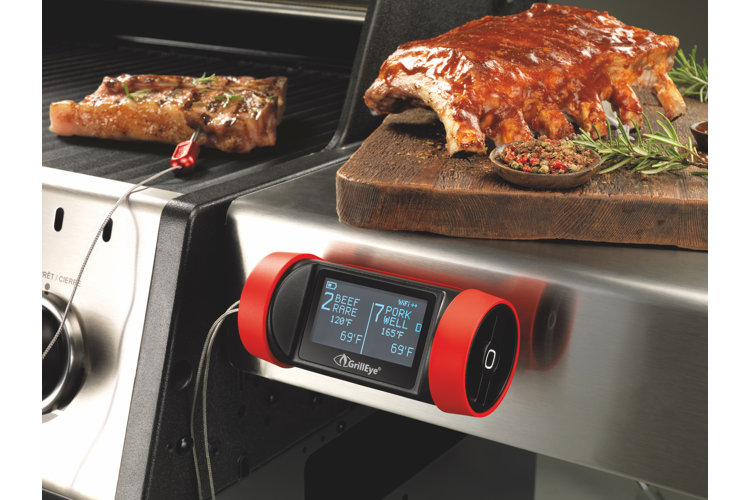
Digital: While several types of food thermometers fall under the digital label, they all have one thing in common - the temperature reading is displayed on a small, digital screen. Though they can be called instant-read, some can take 20–30 seconds to get an accurate reading. Most digital thermometers are not ovenproof and are meant to be inserted directly into food after cooking. Some allow you to keep the probe inserted in the food while it's cooking in the oven with long wires that connect to the reader outside of the oven.
Dial: Not as easy to read as digital thermometers, dial (or analogue) food thermometers are attached to a long metal probe and display the internal temperature of the food on a moving dial. Dial thermometers are often ovenproof, which means you can leave them in the food while cooking. This is particularly useful for cooking a laborious meal, like Christmas dinner. Dial food thermometers display a wide range of temperatures, which makes them ideal for more extreme temperature locations such as the freezer or grill.
Measuring Technology
Probe: Probe food thermometers have a long, sharpened probe that reads the temperature of its surroundings with its tip. The display can be attached directly to the base of the needle-like probe or attached via a wire.
Infrared: These novel food thermometers look like radar guns and measure the temperature of food or oil without ever needing to come in contact with them. Infrared food thermometers are equipped with a laser pointer that doesn't itself read the temperature but shows you where you're pointing the thermometer. Infrared food thermometers are for surface-only temperature measurements which means they don't read internal temperature and thus shouldn't be used to check for meat or poultry readiness. They also aren't optimal for use with particularly polished pots and pans, as polished cookware can reflect the kitchen's surrounding radiation instead of emitting sufficient infrared radiation of its own.
Food Type
Meat: Specifically designed to measure the temperature of meat, meat thermometers typically read from 60° to 105° C. When using a meat food thermometer, you should try to insert the probe into the centre of the thickest part of the meat for the most accurate reading of its internal temperature. As this can be difficult on thin food items such as burgers, pork chops, and chicken, some instant-read thermometers have a smaller probe better suited for thinner cuts of meat.
Caramelising & Deep-Fry: Many instant-read thermometers don't have ranges large enough for the high temperatures of frying oil or caramelising sugar. Sugar and deep-frying food thermometers, often used interchangeably, range from 40° to 205° C. Some frying thermometers can reach up to 320° C. Many of these food thermometers are built to rest against or clip onto the side of a deep pot, with a standard thermometer displaying the temperature with a rising line of mercury.
Cooking Method
Grill: Grill food thermometers fall into two categories: food thermometers that are made specifically to stay in the grill in order to measure its temperature and food thermometers that are exceptionally good at measuring the internal temperature of grilled meats. The latter of those two categories can resemble any of the thermometers described above, while the grill surface thermometers tend to be small dial thermometers that sit in or clip onto the inside of the grill to monitor its temperature.
Oven: Oven thermometers tend to fall into the same two categories as grill thermometers, but when shopping for oven thermometers, you're most likely to find oven-safe thermometers that are meant to remain inside of the oven to monitor its temperature. An oven thermometer is a must-have if your oven doesn't display its own internal temperature or if you're an avid baker. Even the most modern of ovens can be slightly inaccurate when displaying their temperature, so to ensure you're baking at the exact right temperature, we recommend you use an oven thermometer.
Additional Food Thermometer Features
Programmable: Programmable food thermometers can have any number of additional features, including automatic shutoff after a certain amount of time of inactivity, temperature minimum and maximum settings, alarms, timers and more. When shopping for programmable food thermometers, be sure to check the Summary tab of the product description on-site to learn about their specific perks and added features.
Wireless: Despite the name, many food thermometers are not truly wireless however they do allow you to move freely around your house while you cook. The probe reads the temperature of the food while it cooks in the oven with probe wires connecting it to a device outside of the oven. That device sends those readings to a handheld receiver. Wireless food thermometers are exceptionally helpful if you'd like to do other tasks around the house while you cook (perfect for busy holiday preparations). They have a limited range, so they aren't optimal if you'd like to leave your house while cooking.
Bluetooth: Bluetooth food thermometers operate similarly to wireless food thermometers, except in this case the handheld receiver is your phone. These thermometers pair with your phone via Bluetooth so you can monitor your food with a device you'll most likely already have on you at all times. Again, because Bluetooth devices have a limited range, it's not recommended that you stray too far from the kitchen while using a Bluetooth thermometer.
How to Calibrate Your Cooking Thermometer
In order to get an accurate reading, you'll want to calibrate your food thermometer (reset to standard) often. Many thermometers, both digital and dial, have their own calibration button or settings which you can find in the user manual for the device. However, if your thermometer doesn't have a calibration function, use one of these two methods to calibrate your thermometer. Keep in mind that if your temperature registers within 2° C of the accurate temperature, you do not need to calibrate it.
Method 1: Ice Water
First, fill a glass with ice cubes and cold water. Stir the water and let sit for 3 minutes. Stir again. Insert your thermometer's probe or end into the glass, being careful not to let it touch the sides. The temperature should register the freezing point of water, 0° C (32° F). If your thermometer does not read the correct temperature, record the difference and offset your thermometer by that difference when using it to take measurements.
Method 2: Boiling Water
First, boil a pot of distilled water. Once the water has reached a rolling boil, insert your thermometer, being careful not to let it touch the sides or bottom of the pot. Do not take the pot off the heat. The temperature should register the boiling point of water, 100° C (212° F). If your thermometer does not read the correct temperature, record the difference and offset your thermometer by that difference when using it to take measurements.
Tip: If you're using a glass thermometer (including many sugar/deep frying thermometers), it's a good idea to keep the thermometer submerged in the water before you add ice or begin boiling. This prevents the glass from being shocked by a large, immediate temperature change which can cause it to break.
How to Use a Food Thermometer
Once calibrated, your food thermometer is ready to use. Follow these steps to correctly use your food thermometer. For a rundown of the safe minimum temperatures for a variety of meats and other foods, check out the chart at the end of this guide.
Food thermometer usage varies depending on what type of food thermometer you're using. In this section, we'll break down how to use a few different types: probe, infrared and sugar/deep frying. These three types are the most different in design and use.
If you're using a display thermometer, its reading will pop up on its screen. To read a dial thermometer, note where the arrow is pointing. Some dial thermometers have degrees marked in Celsius and Fahrenheit, so be aware of the unit when taking measurements.
Probe
Step 1: If your device is digital, ensure that it is on and registering the temperature of its surroundings before you insert it in food.
Step 2: Insert your thermometer into the center of the thickest part of the food you're cooking. If you're using an oven-safe thermometer, this can occur before the food is cooked. If not, do this step after the food has cooked for an appropriate amount of time.
Step 3: Read the temperature on the display or dial. Check the reading against the safe minimum cooking temperature (chart at the end of the guide) for that given food. If the food is not yet done, repeat step two after cooking for a bit longer.
Infrared
Step 1: Point the infrared thermometer at the food where you'd like to take a surface temperature. If you're trying to accurately measure the internal temperature of hot oil, you can take a ladleful of the hot liquid from the centre of the pot and point your thermometer at that.
Step 2: Press the trigger button and hold it until a reading pops up on the thermometer. A laser pointer may appear and show you where you're pointing the thermometer.
Step 3: Record the temperature and repeat as necessary.
Sugar/Deep Frying
Step 1: Clip the thermometer to the side of the pot, ensuring that its tip is not touching the bottom of the pot. This can damage or break the thermometer.
Step 2: Fill the pot with the desired ingredients and turn on the heat. The tip of the thermometer should be submerged in the liquid.
Step 3: Monitor the thermometer's reading as you cook. Adjust the heat under the pot as necessary to keep the temperature from rising too high or modulating too much.
Safe Minimum Cooking Temperatures
Keep this chart of minimum internal temperatures for safe eating from foodsafety.gov handy as you cook.
Note that 'rest time' in this chart refers to the amount of time you should let the food rest before you take its temperature. Again, be sure to insert your food thermometer into the centre of the thickest part of the food. This location will be the coldest, so if it reads a safe temperature, you can be fairly certain that the rest of the food is up to a safe temperature as well.
Tip: Found this article useful? Then you might also like:
- Understanding all the Different Cookware Materials
- Ask the Experts: What is an Induction Hob?
- Dutch Oven Sizes: Everything You Need to Know
