How to Put Lights on a Christmas Tree Like a Pro
Whose tree is brightest of all?
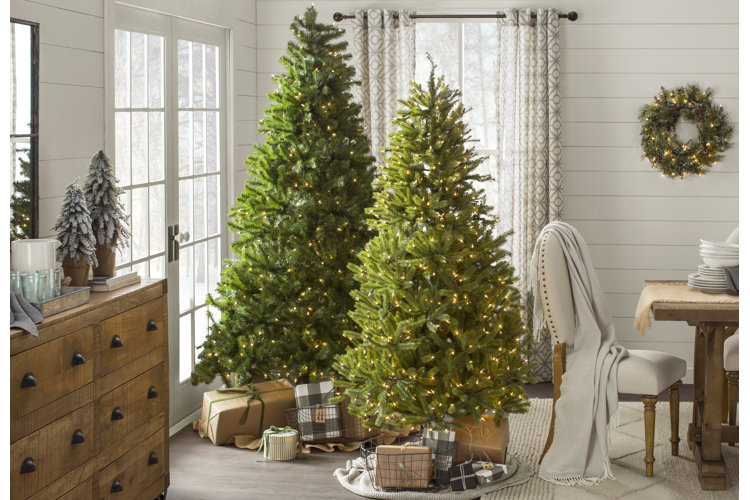
Watching your Christmas tree light up for the first time truly marks the start of Christmas. But if you struggle with hanging lights on your tree each year, we're here to help. In this guide, we explain how many lights you'll need for your tree, as well as cover some of the most popular methods for putting lights on a Christmas tree.
Overview:
How Many Lights Does a Christmas Tree Need?
How to Put Lights on a Christmas Tree
Stringing Lights on a Christmas Tree
Two Ways to Hang Lights on a Christmas Tree
How Many Lights Does a Christmas Tree Need?
The rule of thumb is 100 lights per ft of your tree's total height. If your tree has dense branches, go with 150 lights per foot. We've done the calculations for some of the most common Christmas tree heights below.
6ft Tree: 600–900 lights
7ft Tree: 700–1,050 lights
8ft Tree: 800–1,200 lights
9ft Tree: 900–1,350 lights
10ft Tree: 1,000–1,500 lights
Tip: Need a refresher course on the types of Christmas lights available? Check out our guide, Which Christmas Lights Will You Decorate With This Year?
How to Put Lights on a Christmas Tree
As long as your plugs and outlets are oriented properly, there's really no wrong way to hang fairy lights on a Christmas tree. That said, it's always useful to have a plan of approach before you begin. In this section we outline some essential tips followed by an overview of the two most popular Christmas light hanging techniques.
Tip: Some Christmas trees come pre-lit, so if you'd like to weigh up all of your options before you start planting your lights, check out our guide, Christmas Tree Types.
Stringing Lights on a Christmas Tree
Keep extra light strands on hand. It's always better to have too many light strands as opposed to too few. Having extra lights will ensure that you won't run out while you're decorating. Plus, if any of your light strands break, you'll have replacements within arm’s reach.
Test your lights before you start. We all know the devastation that follows after plugging in your tree's lights and seeing only half of them light up. Before you go near your tree, plug each strand of fairy lights into an outlet and inspect for faulty bulbs. Broken lights? Try replacing burnt-out or broken bulbs first. If that doesn't work, you might have a problem with your fuse.
Orient your light strands properly. Be sure the plug end of your light strand (the pronged end) is always oriented toward the bottom of the tree near an outlet. This way, you can avoid needing to run an unsightly extension cord from an outlet to the top of your tree.
Choose a strategic point of approach. With all three of the Christmas light hanging methods outlined below, you can start from the bottom or the very top of your tree – it's up to you. Starting from the top allows you to cover the most difficult part of the tree first. It's also easier to add additional strings of fairy lights toward the bottom than the top. Starting from the bottom allows you to be more precise with where your strand will protrude from the tree to plug into the wall. Both starting locations are perfectly fine, just be sure to orient your strand so that the plug end is toward the bottom of your tree (ideally near an outlet) and the outlet end is at the top.
Try not to wrap the strand around any branches. Instead, let the lights find natural places to rest atop the tree's branches. For a more natural look, push some lights deeper (3ʺ – 4ʺ) into the tree while keeping others close to the tips of its branches.
Conceal outlet connections. The magic of string lights is that you can easily plug one strand into another to double its length. But the outlet connection between the two can be a little unattractive. If you connected more than one light strand on your tree, conceal the outlet connection by pushing it deep into the tree's branches.
Once you're done, stand back, assess and neaten as you see fit. Once all your lights are laid, it's a good idea to plug them in, take a step back and check your work. An ideal tree will be evenly lit – if any areas look too saturated or too sparse, go back in and move a few lights around. You don't have to take all your lights off of the tree if they don't look perfect; you can easily manipulate their placement and spacing without starting all over.
Two Ways to Hang Lights on a Christmas Tree
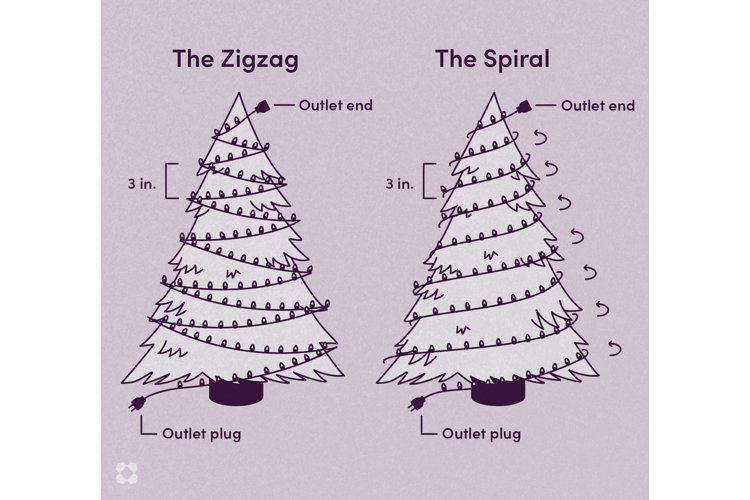
Method 1: The Zigzag
This method is one of the most tried and tested Christmas tree light hanging techniques around.
Step 1: Lay the first horizontal row of lights: If you're starting at the bottom of your tree, lay your first row atop some of its lowest branches. Remember to keep the plug end close to an outlet – you can even plug the strand in while you work if you so desire. If you're starting from the top of your tree, rest a couple of lights atop some of its highest branches. Your row will be much shorter. Move from the left side of your tree all the way to the right (or vice versa).
Step 2: Lay the second horizontal row parallel to the first: If you laid the first row moving left to right, lay your second row moving right to left. If you started from the bottom, this second row will be above the first; if you started from the top, this second row will be below the first. Space this row about 3 inches away from the first.
Step 3: Repeat. Keeping your rows about 3 inches apart, zigzag your light strand horizontally back and forth across your tree until the entire surface is covered in lights.
Method 2: The Spiral
This method is ideal if you'd like your Christmas tree's lights to be as secure as possible. However, this method is more difficult to apply and remove, so be prepared to dedicate an hour or two to this process.
Step 1: Lay the first row of your spiral: Just like with the horizontal zigzag method, you can start at the top or the bottom of the tree. Lighting the top of your tree is especially precarious using the spiral method, so we recommend starting there. Just remember to orient your light strand so that the outlet end, not the plug end, is at the top. Lay your row so that it completes one revolution around your tree, but don't connect the ends of the circle. Spirals' rows are staggered, so gently slant your row upward (if you started at the bottom of your tree) or downward (if you started at the top of your tree) as you lay it around the tree.
Step 2: Lay the second row of your spiral: Repeat the same motion you used to lay your first row, keeping your second row approximately 3 inches above or below the first.
Step 3: Repeat: Wrap your light strands around the tree until the entire surface is covered in evenly spaced rows.
Tip: Enjoyed this article? Then why not also check out these guides:
- DIY Christmas Table Decorations to Keep You Merry and Bright
- How to Hang a Wreath on Your Door
- An Expert's Guide to Hanging Outdoor & Indoor Christmas Lights
